文章出處:http://www.cyberciti.biz/faq/how-to-install-apache-mysql-php-stack-on-freebsd-unix-server/
Install Apache server
To install the port:
# cd /usr/ports/www/apache24/ && make install clean
Or, to add the package:
# pkg install www/apache24
Sample outputs:
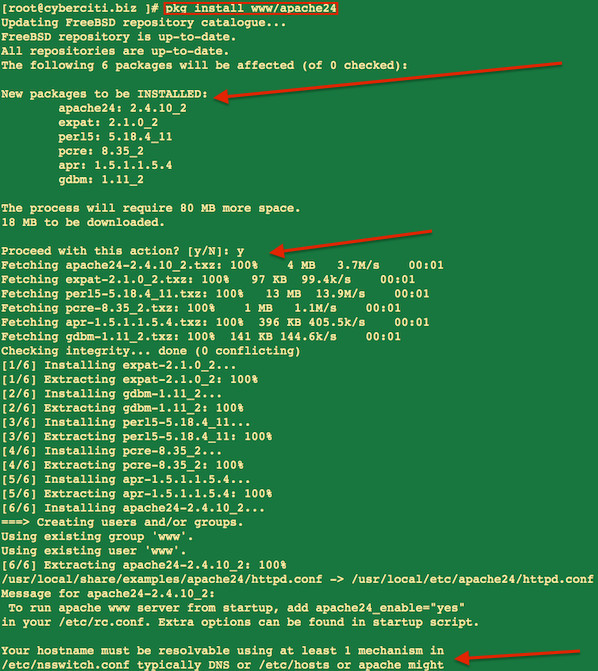
Fig. 01: Install apache
Starting up Apache service on boot
Add following to the end of “/etc/rc.conf” file to launch Apache at start up:
echo 'apache24_enable="YES"' >> /etc/rc.conf
|
Starting / stopping / restarting Apache server
To start Apache to make sure it works:
# /usr/local/etc/rc.d/apache24 start
To restart Apache server:
# /usr/local/etc/rc.d/apache24 restart
To stop Apache server:
# /usr/local/etc/rc.d/apache24 stop
You can also use the service command for starting/stoping/restarting Apache server on FreeBSD:
## service command to control Apache server ## service apache24 start service apache24 restart service apache24 stop service apache24 status |
Sample outputs:
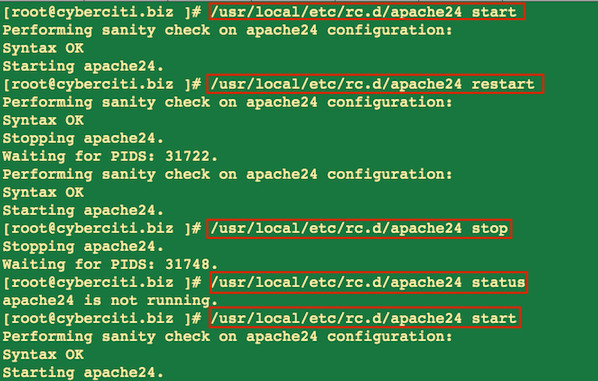
Fig.02: Starting/Stopping Apache
Note: If you are getting this error “Could not reliably determine the server's fully qualified domain name, using 127.0.0.1.” Set the ‘ServerName’ directive globally to suppress this message:
Add next line to /usr/local/ect/apache24/httpd.conf file:
ServerName localhost
Replace localhost with the server’s domain name which can be obtained with:
# hostname -f
Setting up MySQL server
The package or port to be installed will depend on available MySQL version. As of this writing, the maximum available version is 5.6.
Install MySQL server
To install the port:
# cd /usr/ports/databases/mysql56-server/ && make install clean
or, to add the package:
# pkg install databases/mysql56-server
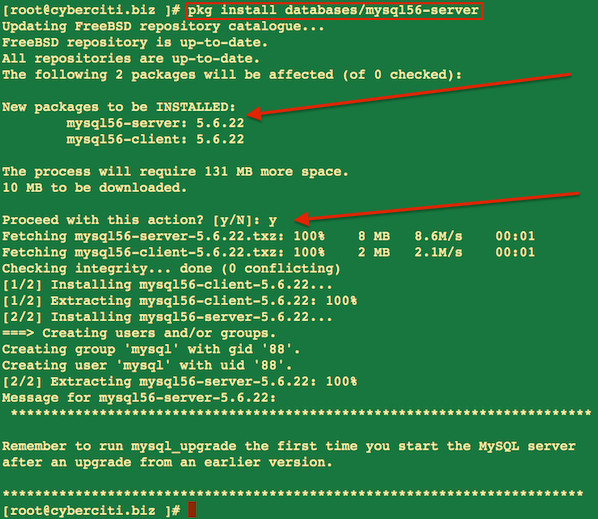
Fig.03: Installing mysql database server
Install MySQL client
To install the port:
# cd /usr/ports/databases/mysql56-client/ && make install clean
or, to add the package:
# pkg install databases/mysql56-client
Starting up Mysql server service on boot
Finally, /etc/rc.conf must contain the following line to allow the MySQL server to start:
echo 'mysql_enable="YES"' >> /etc/rc.conf
|
Starting / stopping / restarting Mysql server
To start the Mysql server type:
# /usr/local/etc/rc.d/mysql-server start
To restart the Mysql server type:
# /usr/local/etc/rc.d/mysql-server restart
To stop the Mysql server type:
# /usr/local/etc/rc.d/mysql-server stop
You can also use the service command for starting/stoping/restarting mysql server on FreeBSD:
## command to start/stop mysql servers on a FreeBSD 10 ## service mysql-server start service mysql-server restart service mysql-server stop service mysql-server status |
Sample outputs:
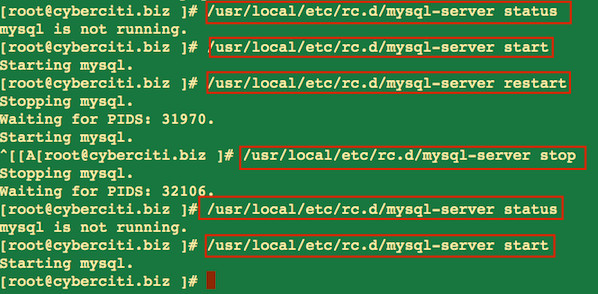
Fig.04: Starting/Stopping mysql server
安裝好 MySQL 後, MySQL root 密碼預設是空密碼, 執行 mysql_secure_installation, 修改 MySQL 的 root 密碼:
然後它會詢問輸入現時的 root 密碼, 直接留空白按 “Enter”, 然後就可以輸入新的 MySQL root 密碼。其他問題可以直接按 “Enter” 用預設值即可, 之後便完成 MySQL 的安裝了。
Install PHP
When you build PHP, you need to add the configuration option so that PHP build includes support for the Apache server. Type the following commands:
# cd /usr/ports/lang/php56

# make config
When the menu comes up to select/deselect various build options. You should select:
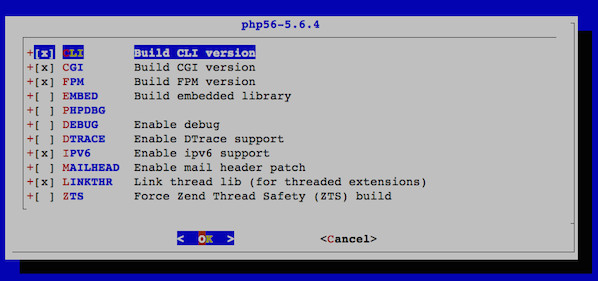
Fig.05: Build PHP using ports collection
Now you will do the make clean command. I normally do these commands all in one but to get the configuration menu, I do them apart.
# make install clean
Install mod_php for Apache
Type the following commands to build mod_php for Apache:
# cd /usr/ports/www/mod_php56

# make install clean
Sample outputs:
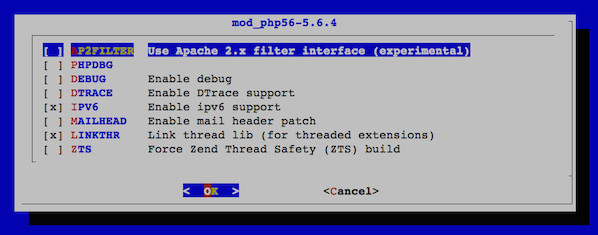
Fig.06: Install mod_php for Apache
Install php extensions
If you aren’t sure if it’s or you didn’t check it with your MySQL install, you will do it the commands the same way so you get the menus to configure to add support for both MySQL and MySQLi to communicate with the MySQL server.
# cd /usr/ports/lang/php56-extensions/

# make config
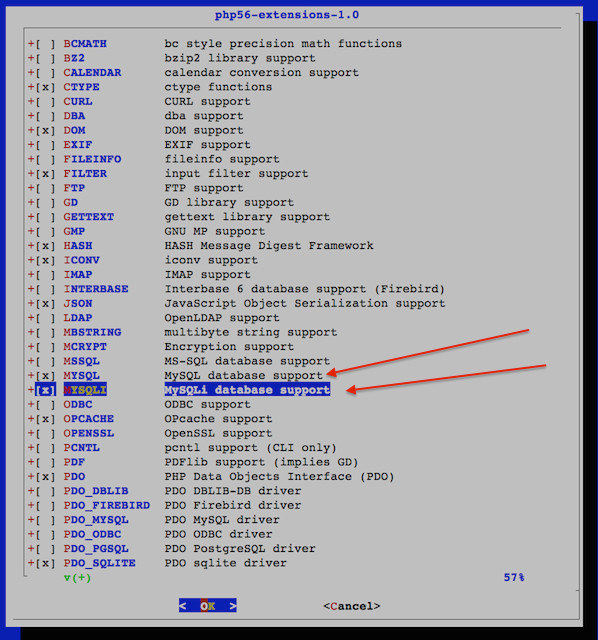
Fig.07: Install popular extensions for Apache
//選擇幾個常用的項目:CTYPE、CURL、EXIF、GD、GETTEXT、ICONV、IMAP、MBSTRING、OPENSSL、PCRE、SESSION、SOAP、XMLRPC、ZIP、ZLIB
You may also select other extensions as per your PHP apps requirements. Then finish up with:
# make install clean
Configure mod_php
To configure it you will type the following command that just makes a copy of a file:
# cp /usr/local/etc/php.ini-development /usr/local/etc/php.ini
To configure Apache and open the file:
# ee /usr/local/etc/apache24/httpd.conf
I use ee (feel free to use vi or Emacs) text editor for simple edits, look for this line:
DirectoryIndex index.html
And change it so it reads as follows:
DirectoryIndex index.html index.htm index.php
Find and set the following values as per your domain, IP, and port number:
ServerAdmin webmaster@cyberciti.biz ServerName www.cyberciti.biz:80 Listen :80 |
Save and close the file. Create a file called /usr/local/etc/apache24/modules.d/001_mod_php.conf as follows:
# cat /usr/local/etc/apache24/modules.d/001_mod_php.conf
<FilesMatch "\.php$">
    SetHandler application/x-httpd-php
</FilesMatch>
<FilesMatch "\.phps$">
    SetHandler application/x-httpd-php-source
</FilesMatch>
Now restart Apache server:
# /usr/local/etc/rc.d/apache24 restart
OR
# service apache24 restart
Test your setup
Create a file called /usr/local/www/apache24/data/test.php:
# vi /usr/local/www/apache24/data/test.php
Append the following code:
<?php
    phpinfo();
?>
|
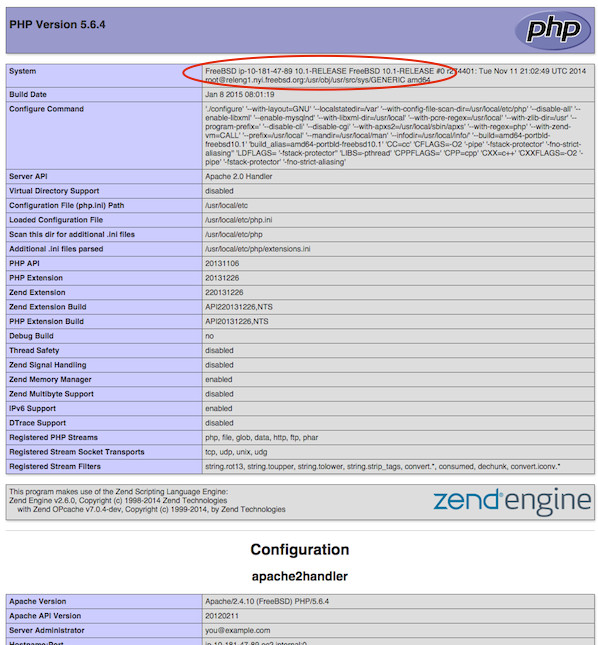
Save and close the file. Fire a web-browser and type the url:
http://your-domain-name/test.php
http://your-ip-address/test.php
Sample outputs:
三、安裝PhpMyAdmin
# cd /usr/ports/databases/phpmyadmin
# make install clean;
# mv /usr/local/www/phpMyAdmin /usr/local/www/apache24/data/phpmyadmin
# cd /usr/local/www/data/phpmyadmin
# cp config.inc.php.sample config.inc.php
http://ip/phpmyadmin
裝好 database/phpmyadmin
注意!在編譯設定時,要把APC取消掉,因為它不支援php5.5
預設安裝路徑是/usr/local/www/phpMyAdmin你可以去 www/nginx 下
# ln -s ../phpMyAdmin phpmyadmin
或是透過設定 nginx.conf 來指定 phpMyAdmin 的位置
可以先連線到 localhost/phpmyadmin 測試看看可不可以登入
帳號是root 密碼就是前面設定的那一個
接著到 phpmyadmin 複製設定檔
# cp config.sample.inc.php config.inc.php
如果登入phMyAdmin 出現密碼過期重新設定mysql密碼
接著要修改 mysql root 密碼
# mysqladmin -u root -p password
Enter password:(預設密碼是NULL 直接輸入Enter換行)
New password:
Confirm new password:
Fig.08: Apache + PHP server ready on FreeBSD

 留言列表
留言列表